How To Add VHS Effects To Videos in 2024

How To Add VHS Effects To Videos in 2024

VHS was a video reproduction standard created by Philips in 1974. It made it possible to have home recording and replay machines at competitive prices. From the consumer's point of view, it was a real revolution these days, and VHS competed with Sony's standard video player, Betamax.

In the long run, VHS took the market. In 1988 Sony ended up producing Betamax machines, switching their production model towards VHS players. Everyone who lived in those days can remember how amazing it was when you could record and watch a TV show or film later.

Unbelievably, those old tapes' low quality and retro features have become popular these days. Old VHS resolution used to be 320 x 240, while a standard YouTube video has a resolution of 1920 x 1080p

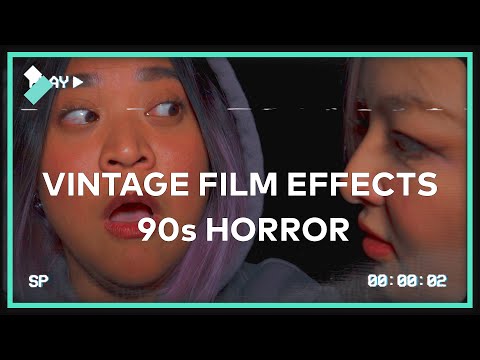
VHS video effect refers to editing videos to add noise, grain, saturation, and more effects to the original footage to downgrade its quality and create an "old-time appearance" to the video.

There are two main ways to add VHS retro effects:

1-Using online video editors (Like Veed, Flexclip, and others)

2-Using offline editors (Filmora, Adobe Premiere, FinalCut Pro, Videoproc, DaVinci Resolve, and others). Many plugins and add-ons for these programs offer all kinds of effects and VHS overlays.


RELATED READING15 AI Video Generation Platforms – Text To Video


Both online and offline editors work adding an overlay to the original video that simulates a retro video.

Let's check them in detail:


Veed

vhs effects to video


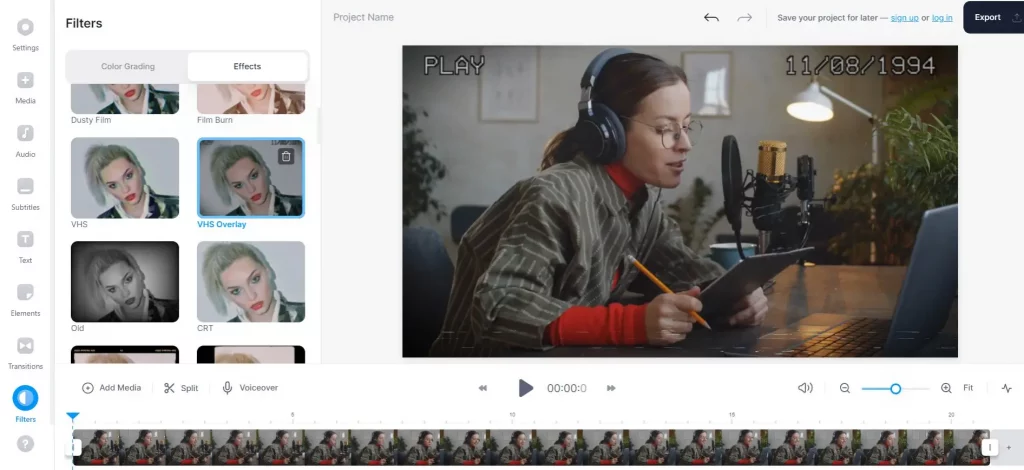
Veed is an online editor that lets you add  vintage aesthetics to any video. It is cloud-based, and there is no need to install a program. It runs within a standard browser and an internet connection.

With Veed, you can add VHS effects with noise and glitch. You need to upload a video to the platform and in the effects tab, select "VHS overlay", blur, noise or any other effect you wish. Then the magic is done; your video has traveled back 30 years.

The exciting thing about Veed is that you can add VHS effects to video for free since it is included in the free plan with an acceptable 720p resolution. A paid plan is $12/month, not bad for a complete online video editing platform.


Flexclip

vhs effects to video

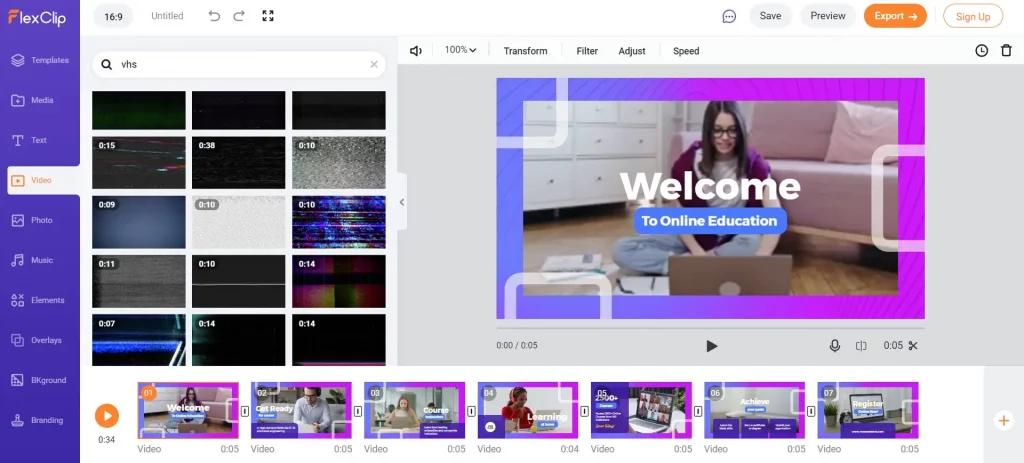
Flexclip is a complete online video editor that lets you add retro effects and overlays to videos. You simply need to upload your video and select a VHS overlay from the library.

This platform offers a vast library of VHS effects,  and this feature is supported in the free plan. Keep in mind that video export quality in the free plan is only 480p. The next plan starts at $5.99/month with 720p exports.


Filmora

vhs effects to video

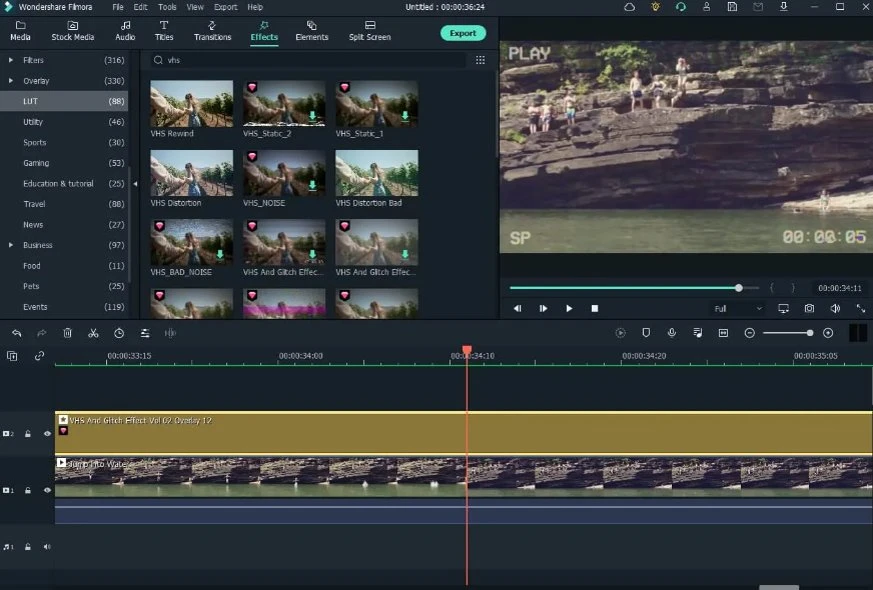
Filmora is a well-known name in the video editing industry. This is a beginner-friendly downloadable software you must install on your PC or Mac. It is free to download, but videos created with this version show a watermark.

You will have to pay $49.99/year or $79.99 for a perpetual plan to remove it.

Once you upload a video, in the search bar, look for VHS effects. Then drag and drop any of them above your video on the timeline, then drag it on the video's length. Filmora features many VHS video effects; rewind, noise, glitch, distortion, and more.

Watch this short video about VHS effects with Filmora

YouTube video


VideoProc Vlogger

vhs video effect

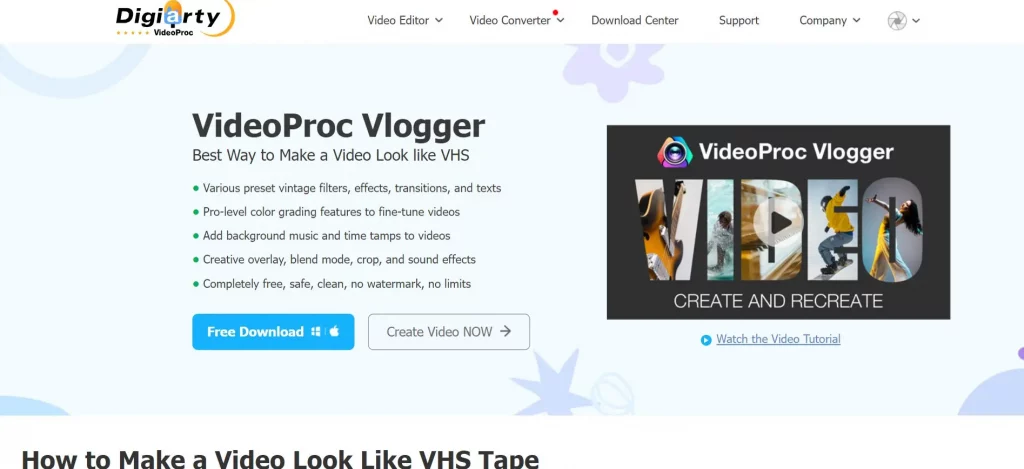
VideoProc Vlogger is a downloadable video editor with complete color grading and correction, motion presets, motion crop, time-lapses, VHS effect video, and full features to cover many editing needs.

This software is free to download and use, with no watermark or other restrictions. You must upload the video and select VCR filters to turn your video into a vintage version. VideoProc Vlogger offers fewer filter options than similar platforms. Still, it is an excellent option to try as a free tool.


Adobe Premiere, After Effects, DaVinci Resolve:

There are many options for adding vintage video effects when you create and edit videos with any of these software.

Cinepacks offer a free sample of VHS overlays and TV screen overlays. These are compatible with Premiere Pro, After Effects, Final Cut Pro X, Davinci Resolve, and similar software.

This pack features 20 assets that need no installation. You just drag and drop them to your video timeline.

Retro VHS effects and textures by Sickboat is a complete toolkit compatible with all video and photo editing software. For an incredibly low price of $24.99, this tool offers over 200 VHS effects and overlays in 4K resolution, making it an exceptional value for its price.


RELATED READING: Best Interactive Video Platforms


Envato Elements is another source for adding VHS effects to videos. This marketplace features 260+ templates for After Effects, Premiere, DaVinci Resolve, FinalCut Pro, and Apple Motion.

There are standard resolution templates, but you can find 4K overlays too.

Shutterstock features a vast library of 25K+ VHS effects to video footage. You can choose resolution, aspect ratio, duration, frame rates, and more items to get the ideal effect you are looking for.

Maxon offers the Universe plugin, intended to add VHS effects to video. This software can add VCR-style text, timecode, record speed, and even function icons such as Play, Fast Forward and Rewind.

This platform features granular control over your video and offers many options to turn your video into VHS style.

Maxon costs €227/year and is available for Adobe After Effects, Premiere Pro, Apple Final Cut, Apple Motion, Vegas Pro 14 or later, and DaVinci Resolve14 or later.


Conclusion

There are different options to add VHS effects to your videos, from free online software to paid and professional choices. Each of the above mentioned tools has a different approach, the one you choose depends on your actual needs.


How To Add VHS Effects To Videos in 2024 Read More »

vhs video effect

How To Review A Video: A Comprehensive Guide For Beginners

How To Review A Video: A Comprehensive Guide.

If you're a content creator or someone who wants to share their video content online, it's essential to know how to review your videos properly. Video reviews help you to identify areas that need improvement and create high-quality content that engages your audience.

In this article, we'll cover the basics of reviewing a video, including the importance of video reviews, essential elements of a good video review, and practical tips for creating a video review.

Why is Video Review Important?

Video reviews are essential because they help content creators identify areas for improvement and create high-quality content that engages their audience. A well-executed video review can help you to:

  • Ensure that the content meets the desired objectives
  • Identify areas of improvement in terms of video quality, sound, and lighting
  • Highlight strengths of the video that can be further built upon.
  • Create actionable feedback to improve future videos.
  • Understand your target audience better and tailor your content accordingly.


RELATED READING: 10 Best Video Review Software To Speed Up Feedback – Free & Paid Options


Essential Elements of a good video review

Creating a compelling video review requires more than just watching the video and sharing your thoughts. To create a valuable video review, you must consider the following essential elements:

Clear and Concise Communication

Effective communication is crucial to any form of review, and video reviews are no exception. A good video review should be clear, concise, and understandable.

Avoid using complicated language or technical jargon that your audience may not understand. It's best to use simple language to ensure your message is well-received.

Attention to Detail

A good video review should pay attention to every detail. Watch the video multiple times, paying attention to every aspect of the video, including script, sound quality, lighting, and visuals. Identifying all areas that need improvement and providing actionable feedback to help the creator improve future videos is essential.

Objectivity

It's essential to maintain objectivity and honesty when reviewing a video. As a reviewer, you should avoid being biased and provide an honest assessment of the video's strengths and weaknesses. Remember to focus on the content of the video rather than the person who created it.

Practical Tips for Creating a Video Review

Here are some practical tips to help you create an effective video review:

Use the right software

Video review software saves time and money when it comes to video review. These platforms allow you to get and share feedback asynchronously or in real time without making enormous mail threads or managing countless file downloads.


RELATED READING: Secure Video Review Tools: Ensuring Your Video Review Process.


Set Specific Goals

Before starting the review process, it's essential to understand the purpose of the video. Questions such as "who is the target audience?" and "what is the intended outcome?" are critical in determining whether the video has achieved its goals.

Watch the Video Multiple Times

Watch the video several times, paying attention to every detail. This will help you identify the video's positive and negative aspects.

Take Detailed Notes

Taking detailed notes is essential when reviewing a video. Make notes on the video's strengths and weaknesses, and include specific examples of areas that need improvement. Be as clear as possible, noting the time codes of any issues or positive aspects you observe in the video.

Focus on Both Positive and Negative Aspects

When creating a video review, it's essential to focus on both the positive and negative aspects of the video. Highlight the strengths of the video and areas that need improvement. This will help the content creator to understand what they're doing well and what they can improve upon.

Use Examples and Visual Aids

Examples and visual aids can make your video review more engaging and understandable. Use screenshots or short clips from the video to illustrate your points. This will help the content creator to understand your feedback better.

Provide Actionable Feedback

Feedback should be actionable, meaning the content creator can apply it to improve future videos. Be specific and provide practical suggestions for improvement. For example, instead of saying, "the lighting is bad," say, "try using a brighter light source or repositioning the camera to improve lighting."

Conclusion

Reviewing a video is crucial to creating high-quality content that engages your audience. Following the tips and essential elements outlined in this article, you can create a compelling video review that provides actionable feedback to the content creator. Remember to maintain objectivity and professionalism throughout the review process and focus on the video's positive and negative aspects.

Create Riveting Animated Explainer Videos Easily

Subscribe to Our Newsletter

Subscribe now for free before Elon buys our site and charges a monthly fee of $5,000 😉

Zero spam. Read our privacy policy for more info.

How To Review A Video: A Comprehensive Guide For Beginners Read More »

how to review a video

How to Make an Interactive Video in 6 Simple Steps

How to Make an Interactive Video in 6 Simple Steps

There are many tools to make an interactive video, and in this post, we will focus on the six basic steps to follow to achieve the best results.

Viewers can play, pause, or forward the content in a typical passive video. But interactive videos allow viewers to interact with the story and decide the path to go, creating high-engagement moments.

Consumers watch interactive videos differently because they feel within an immersive experience that shows elements like quizzes and hotspots. These are unique items that grab their attention.

Taking advantage of personalization is a big plus since viewers are keen to pay attention to content that is relevant to them. This strategy is a secure road to higher click-through rates and better engagement levels.

Whether your video is about marketing, sales, education, or human resources, creating your own interactive video will significantly boost viewer engagement.

And although most brands are using video to connect with consumers, today, interactive videos offer an excellent opportunity to stand out from the crowd. As a rule of thumb, consider interactive videos' click-through rates up to 10 times higher than regular videos.

The process to make an interactive video requires work but is not difficult. Your conversions will increase with a good strategy, the right tools, and a simple workflow.

Check our essential six-step guide to making an interactive video.

1-Planning

To make an interactive video, the first and fundamental step is planning. Concentrate your efforts on storytelling, who is your target viewer, what you want to communicate, and which is the best approach.

Write a script for each element of the video, and if you decide to use branching, you will also need a script for every branch.

Prepare written and graphic content for buttons, overlays, hotspots, and every interactive element you plan to include in the video.


2-Shoot your video

Once you have done your planning, the following step to make an interactive video is shooting. You can create your own video using any commercial editor, like Filmora, DaVinci Resolve, Adobe Premiere, or Camtasia.

On the other hand, many online platforms feature pre-built templates and drag-and-drop editors to make a video. You can make a video in a matter of minutes, and some also have free basic plans (Check InVideo, Wavevideo, or FlexClip)


3-Choose your interactive video platform

When your video is ready, you need to upload it to an interactive video platform to add interactive capabilities like buttons and hotspots. Here is where the magic happens, and you start to make an interactive video from a regular video.

You can choose among enterprise-focused video platforms like Wirewax, Vixy, and Smartzer, with many features, including transcription and editing.

But many other options provide an excellent cost-benefit relationship, like Spott, Adobe Captivate, and Hihaho, to name a few. The great advantage of Hihaho is that you can play around with the platform for free. You only have to pay when you want to download the video.

Check our article about  18 Best Interactive Video Platforms and pick the platform that suits your needs. Notice that some also offer free trials, so you can evaluate them and learn the ropes

4-Add interactive elements

You can start adding interactive elements when you are logged into the interactive video platform. Most platforms feature drag-and-drop dashboards to make this process relatively straightforward.

There are many options for interactive elements:

Buttons: Add clickable buttons throughout the video to drive actions.

Images: Add images to enrich viewers' experience. Product images, charts, or specifications can guide the customer to the appropriate stage of the funnel.

Hotspots: Add fixed hotspots (to a fixed position on the screen) or sticky hotspots (these stick to moving people or objects and get a much higher engagement rate)

Quizzes: Embed multiple-choice questions to test viewers' knowledge or provide them with an assessment.

Quizzes are a superb tool to gather consumer data and increase further personalization.

Forms: Add input forms where viewers can enter their information to subscribe to a mailing list or get viewer data.

Branching: This is one of the most exciting features of interactive videos and allows viewers to choose which content is relevant to them.

If you decide to use branching,  Twine is free software for designing branching scenarios within interactive videos to build stories.

Product overlays: Add product images to take viewers to a sales page or a detailed product description.


RELATED READING: 6 Types of Interactive Video


5-Publish your video

When you preview the video and consider it finished, you are ready to publish it. The platform will provide a link that you can copy to your website to embed the video.

If you want to make an interactive video to publish on YouTube, consider that YouTube does not support interactive video features like hotspots, clickable links, and branching. You can upload each branch of your story as an individual video and link them up.

YouTube video


YouTube allows a maximum of 4 video cards on an end screen. This means you can give the viewer up to four options at the end of every segment.

If you choose to do this, only promote your first video, and hide the others from your listing to ensure the viewer starts from the beginning. Also, consider that if you have a video shorter than 25 seconds or is classified as "Made for Kids," YouTube won't allow you to create links.

On the other side, Vimeo provides advanced features to make an interactive video on its platform. At the time of this writing, it is only available to enterprise users.


6-Track your results and adjust your strategy

In a regular passive video, you can only measure views. Still, it is impossible to know engagement and what part of the video work for the consumer.

Interactive video is different because these platforms track every interaction, click, and conversion. Needless to say, this is an excellent reason to start creating interactive videos.

This valuable information allows you to fine-tune your strategy and adjust your video content according to consumers' behavior. And since many interactive video platforms provide useful integrations, you can collect customer data to improve personalization.

The era of personalized experiences is here, and technology makes it possible to get a detailed picture of your viewers' interactions.

Create Riveting Animated Explainer Videos Easily

Subscribe to Our Newsletter

Subscribe now for free before Elon buys our site and charges a monthly fee of $5,000 😉

Zero spam. Read our privacy policy for more info.

How to Make an Interactive Video in 6 Simple Steps Read More »

How To Add Watermark To Videos For Free

How To Add Watermark To Videos For Free

If you need to add watermark to your video for free, there are many options including offline and online software.

Applying a watermark to your video is an excellent option to safeguard your content. A copyright disclaimer maybe not be enough to discourage viewers from downloading and editing your video. Millions of videos are shared daily, and a watermark is a must when it comes to protecting your work.

Plenty of online video apps like Animaker, Media.io, Powtoon, and others offer to add watermarks for free. Although it is true you can sign up for a free plan and add a watermark, they apply their own watermark to videos for free plan users. The story ends with a video and two watermarks…

The tools chosen here are 100% free. We have listed below five options to add watermarks to your videos. Check them out:

Pro Tip: To reduce blocking or interferences, it is better to use a PNG file (that has a transparent background) for watermarks.

 Any Video Converter

any videoconverter homepage


Any Video Converter is a program suitable to add a watermark to videos for free. This is downloadable software, so you do not need to be online to watermark your videos.

You can use it to convert video files into several formats for free. There is a paid option at $9.99/year, an excellent pricing considering the program's features.

Any Video Converter is easy to use. We tested the tool with text and PNG watermarks and got good results while maintaining fast rendering and processing times.

Any Video Converter key features

  • 100% free to use.
  • Can batch download videos and music from YouTube.
  • Supports text and image watermarks.
  • You can preview the video with watermark before rendering.
  • Includes: Adjust brightness, saturation, flip, rotate, crop, effects, and more free tools.
  • Basic video editing features.

Any Video Converter pricing

  • Free version available for download.
  • Ultimate version: $49.95 one-time payment with premium features.


Online Converter

online converter homepage


Online Converter is an online tool you can use to add watermarks to your videos for free. This software includes many additional free services to compress videos, merge videos, cut videos, rotate videos, and more.

Online Converter did an excellent job when we tested the tool. Rendering time was quick, and the whole process was fast and straightforward.

Online Converter key features

  • 100% free to use.
  • Supports text and image watermarks.
  • Supports MP4, AVI, WMV, FLV, DIVX, 3GP, and more file formats.
  • You can choose where to apply the watermark.
  • The output format is in MP4 only.

Online Converter pricing

This tools is free to download and use.

Watermark.ws

watermark.ws homepage


Watermark.ws is the most complete website available for adding watermark to videos for free. They also offer a paid plan at $4.17/month (billed yearly) that improves processing times, adds watermark templates, adds watermarks to photos and videos in batch, filters, and more options.

Watermark.ws supports standard video file formats, allows the addition of watermarks in batch, and runs on any web browser. There is no need to install any software.

If you need to watermark videos regularly, this is for sure the software to go.

Watermark.ws key features

  • 100% free to use. Affordable paid plan.
  • Custom text watermarks with hundreds of fonts.
  • Effects, filters, and resizing capabilities.
  • Watermarks photos, videos, and GIFs
  • Batch and automated watermarking.
  • Files are deleted from servers in 24 hours in the free plan.

Watermark.ws pricing

  • Free plan: Basic features to edit 30 seconds of video at a time.
  • Premium plan: $4.17/month to edit unlimited videos, watermark templates, fast processing and more.


RELATED READING: Best Interactive Video Platforms


CreatorKit

creatorkit homepage


CreatorKit is an online software to add watermark to videos for free. This tool is easy to use, and you don't even need to create an account.

CreatorKit also features animated text styles, video templates, transitions, filters, add text to video and more useful tools.

CreatorKit key features

  • 100% free to use.
  • You can choose 9:16, 4:5 or 1:1 aspect ratio.
  • Supports MP4, MOV, AVI and more formats.
  • Output only in MP4.

Check CreatorKit in action:

YouTube video

CreatorKit pricing

Free to use


RELATED READING: 15 AI Video Generation Platforms – Text To Video


Aspose

aspose homepage


Aspose is an excellent tool to add watermark to videos for free. As other similar platforms, this software offers compress, merger, resize, cutter, muter, speed changer, rotate and more video tools.

Aspose key features

  • 100% online tool.
  • You can set watermark position; bottom right or left, top right or left.
  • Supports FLV, AVI, MP4, WMV, GIF and more formats.
  • Video file is deleted from servers in 24 hours.
  • Many other video tools available for free.

Aspose pricing

Free to use


Conclusion

The above software to watermark videos for free allows you to protect your work. You can design the watermark to minimize that your video content can´t be used without modification; for example setting the watermark position in the middle of the screen.

You can also use watermarking as a brand strategy to keep consistency across all your video content. Try any of these tools and test which one is the best for your needs.

Change your voice in fun ways and enjoy listening to your modified voice with the new Voice Changer feature! There are 5 kinds of voice-changing effects, which include male voice, female voice, child voice, robot voice, and Transformers voice.

Subscribe to Our Newsletter

Subscribe now for free before Elon buys our site and charges a monthly fee of $5,000 😉

Zero spam. Read our privacy policy for more info.

How To Add Watermark To Videos For Free Read More »

add watermark to video

How To Download LinkedIn Videos For Free in 2023

How To Download LinkedIn Videos For Free in 2023

If you are wondering how to download LinkedIn videos, this post will show you how to do it quick and easily.

Many free platforms allow to download LinkedIn videos and save them on a PC, tablet, or mobile device. This way, you can watch them later for future reference.

And if you need to edit the videos, we recommend Wavevideo (an online platform for editing videos) or Filmora (a beginner-friendly downloadable video editor and creator)

As with many other social media networks, LinkedIn videos and LinkedIn learning videos are the most shared content. This is a consequence of the exponential growth of video usage in recent years, with an average of 19 hours of online video per week in 2022. Check these stats from Wyzowl:

video stats infographic


We have listed the best LinkedIn video download tools we could find. Check them out.


KeepFlick

keepflick homepage

With KeepFlick, you can download any LinkedIn video for free.

All you need is to click the three points in the upper corner of the video and click url; copy it and paste it into the downloader box.

Once you paste the url, right-click the download button and choose the "Save link as" option to save the video file to your computer.


RELATED READING: Video Marketing Courses for Beginners


Linkedradar

linkedradar homepage

Linkedradar is a free extension for browsers to download LinkedIn videos, available for Chrome and Edge. Once you install it, go to LinkedIn and refresh the page.

This extension adds a small download icon on the top left corner of the video. All you have to do is click on it to begin downloading.

Linkedradar also worked on LinkedIn Learning videos and did an excellent job in our testing.


YMP4

ymp4 homepage

YMP4 is a free and quick tool to download LinkedIn videos for free. You can do this in three simple steps, copy the video URL, paste it into the YMP4 text box and then download the video in a snap.


Viddownloader

viddownloader homepage

Viddownloader is a free online tool for downloading LinkedIn videos. It supports SD, Full HD, and 4K formats.

This software supports many video platforms, such as LinkedIn, Flickr, Instagram, Dailymotion, and many other sites.

So if you need to download videos regularly, this is a tool to consider.


DownVideo

downvideo homepage

Downvideo is a free tool for downloading LinkedIn videos. Simply copy the video URL, paste the link, and download the video. With this platform, you can also download videos from more than 40 sites to your PC in SD, HD, 420p, 1080p, and more formats.


RELATED READING: Password Protect Video Explained (With Examples)


KEEPOffline

keepoffline homepage

KEEPOffline is a free tool to download LinkedIn videos. All you need is to open your feed and copy the video URL. Then paste it on the downloader tool and choose your format; MP4, MP3, or MPV.

Once you click the download button, the video will be downloaded in no time. You can save it on your PC to watch later or also do some editing.


ExpertsPHP

experts php homepage

ExpertsPHP is a free online tool for LinkedIn video download. It supports MP4 and 720p video formats.

This page works as similar platforms. You copy and paste the URL of the video. Click the download button, and you are ready to save the video on your PC.


How to post a video on LinkedIn

If you share a video on LinkedIn, you must meet these requirements:

  1. Supported video formats are: ASF, FLV, MPEG-1, MPEG-4, MKV, MP4, WebM, H264/AVC, VP8 and VP9, WMV2 and WMV3. Note that AVI and QuickTime are not supported.
  2. Maximum file size: 5GB
  3. Minimum file size: 75 Kb.
  4. Maximum video duration: 15 minutes when uploading from desktop and 10 minutes when uploading from the LinkedIn mobile app.
  5. Minimum video duration: 3 seconds.
  6. Resolution range: 256x144 to 4096x2304.
  7. Aspect ratio: 1:2.4 - 2.4:1
  8. Frame rate: 10fps - 60 fps
  9. Bit rate: 192 kbps - 30 Mbps

Conclusion:

If you need to download a LinkedIn video, any of the above platforms will help. I have tested them all, and they work, but in my opinion, the Linkeradar extension offers the best functionality.

Please note that downloading videos from LinkedIn may have copyright issues. You should check before downloading not to violate any terms of service or property rights.

Subscribe to Our Newsletter

Subscribe now for free before Elon buys our site and charges a monthly fee of $5,000 😉

Zero spam. Read our privacy policy for more info.

How To Download LinkedIn Videos For Free in 2023 Read More »

download linkedin video
Scroll to Top